The Department of Libraries uses Microsoft Teams for training and meetups. The first time using Teams it may take a couple of minutes to get everything set. Note - You do not need a Microsoft account.
Getting Started
Click the link presented. Note - you can do this ahead of time (even days before the meeting), if you want to verify that you can connect. Once things are working, just leave the meeting.
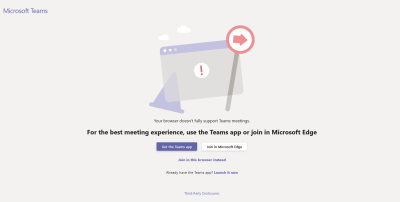
It will ask if you want to download the Teams app, or if you’d prefer to use your browser (if you use Chrome or Microsoft Edge). The app is probably a slightly better experience, but it should work either way. Some browsers (such as Firefox) will not work without the app. Note – if you have an older operating system (for example, pre-2015 Mac), you may find that neither the App nor the most up-to-date browser you can run will work.
Once you download the app, go in to downloads on your browser, and run it. It will let you know that it is installing, and once complete, will bring you to the join screen. You will only need to do this the first time you install the app.
If you’re using your browser to participate, it may ask to use your camera and microphone. If you choose to not allow, then they won’t work within Teams.
Join Screen
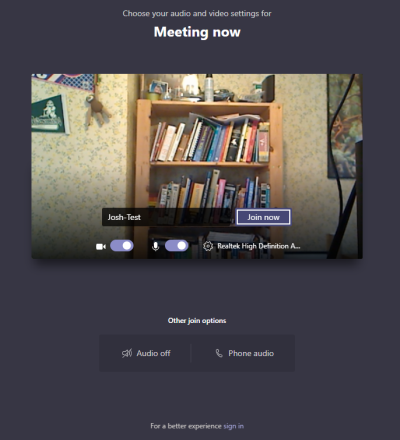
After clicking on the meeting link, you’ll see the join screen. In the middle, it will show the view from your camera (if activated). There’s an icon for your camera and microphone – slide them to the left to deactivate (you can switch on and off once you’re in the meeting). To the right is a gear icon, along with the name of your microphone – click on it to change which mic or camera you are using. Further down are options to turn audio off entirely, or to use your telephone for audio.
Telephone – If you don’t have a mic/speakers, or are having trouble with your audio, you can always call-in for audio instead. Use the number listed in the invitation, followed by the conference ID and then #. Make sure that you are only using the mic and speaker from either your phone or computer, not both (or you’ll get feedback). If using a telephone, you can mute and unmute yourself by pressing *6 on your phone.
Once you are ready to go, enter the name you’d like to use (it’s just for display, there is no login) and click Join. After joining, you’ll be placed in the lobby, until one of the presenters invites you in.
In the Meeting
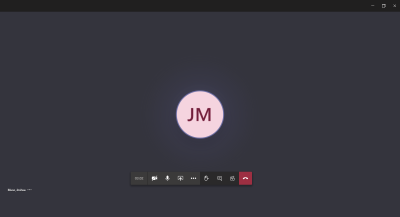
In the meeting, you’ll see a view of four of the most recent people to talk. If using your browser, only the most recent speaker will fill the screen.
In the bar at the bottom middle of the screen, you have a variety of icons. From left to right, you’ll see:
- Time - How long you have been in the meeting
- Camera – You can turn your camera on or off
- Microphone – You can mute or unmute yourself
- Box with Arrow – This is the share icon. If you’ve been given presenter permissions, you may be able to share your screen or other content.
- Three dots – This includes a number of miscellaneous options.
- Show Device Settings – This allows you to change your microphone, speaker, or camera.
- Show Meeting Details – Shows the link and phone number for the meeting.
- Enter/Exit Full Screen – The Teams app covers your whole screen. You can hit it again or click Esc to stop.
- Turn off Incoming Video – You can disable video from all speakers.
- Raise Hand – Clicking this icon shows that you have a question, or would like to speak.
- Speech Bubble – This opens the chat window on the right side. You can read what has been shared, as well as typing your own messages.
- People Icon – This brings up the participants window, also on the right side. With this, you can see everyone who is attending.
- Red Phone Handset – With this icon, you can leave the meeting.
(Note – I’m not sure if this available to guests) To select one speaker to follow, right click on their view and select Pin. You can also right click and choose Fit to Frame or Fill Frame, to see a slightly different view.


